How to Write SSH Config
SSH Can Do Many Things
SSH is a tool that I think developers use frequently.
Basically, it’s a tool used to enter a remote machine and run shell commands, but it can actually do many things.
Recently, I had the opportunity to use SSH in a fairly complex configuration at work, so I wrote SSH Config. This article summarizes what I learned at that time.
Basic Form
Host my-con-name
    HostName xx.xx.xx.xx
    Port 22
    User my-user-name
    IdentityFile ~/.ssh/id_rsa
    IdentitiesOnly yes
I think this is the basic form.
Host my-con-name specifies the connection name.
When you type the command ssh my-con-name with the name specified here, the settings written above are automatically applied.
HostName specifies the domain name or IP address of the destination.
Port specifies the port number of the destination.
Port 22 is the well-known port for SSH, so if this is not specified, port 22 is used.
However, many SSH servers change their port numbers for security reasons.
User specifies the username for the destination.
The basic form when doing this without config is ssh my-user-name@xx.xx.xx.xx, but by writing this, you can also omit the my-user-name part.
IdentityFile specifies the private key. The default used is id_rsa or id_25519, etc., but when using a different key, specify it here.
When using multiple keys, you should specify IdentitiesOnly yes.
Otherwise, for example, even if you specify IdentityFile ~/.ssh/my_id_001, if id_rsa exists, the behavior would be “first try connecting with id_rsa, and if that fails, try my_id_001”.
This is not the intended behavior in most cases.
Multi-hop SSH
A common configuration is to first SSH to a bastion server and then SSH to another machine from there.
This is configured as follows:
Host bastion
    HostName xx.xx.xx.xx
    Port 22
    User my-bastion-user-name
    IdentityFile ~/.ssh/id_rsa
    IdentitiesOnly yes

Host my-con-name
    HostName yy.yy.yy.yy
    Port 22
    User my-user-name
    ProxyJump bastion
    ForwardAgent yes
With this setup, just typing ssh my-con-name gives the same effect as
“doing ssh my-bastion-user-name@xx.xx.xx.xx and then ssh my-user-name@yy.yy.yy.yy from there”.
ProxyJump bastion is the key point.
ForwardAgent yes is a setting that allows authentication to servers beyond the bastion as if using the private key kept locally.
Since transferring private keys to the bastion is not good for security, this should basically be set to yes.
The SSH chain with ProxyJump can be any number of hops. For example, with the following configuration, access would go bastion1→bastion2→server.
Host bastion1
    HostName xx.xx.xx.xx
    Port 22
    User my-bastion1-user-name
    IdentityFile ~/.ssh/id_rsa
    IdentitiesOnly yes

Host bastion2
    HostName yy.yy.yy.yy
    Port 22
    User my-bastion2-user-name
    ProxyJump bastion1
    ForwardAgent yes

Host my-con-name
    HostName zz.zz.zz.zz
    Port 22
    User my-user-name
    ProxyJump bastion2
    ForwardAgent yes
Port Forwarding
There are three types of port forwarding. Let’s look at each one.
LocalForward
Host my-con-name
    HostName xx.xx.xx.xx
    Port 22
    User my-user-name
    IdentityFile ~/.ssh/id_rsa
    IdentitiesOnly yes
    LocalForward 8080 yy.yy.yy.yy:80
By setting it up like this and doing ssh my-con-name, port forwarding occurs.
When you access 127.0.0.1:8080 on the local machine, access to yy.yy.yy.yy:80 from xx.xx.xx.xx occurs.
Data returned from yy.yy.yy.yy:80 to xx.xx.xx.xx is sent to 127.0.0.1:8080.
In other words, from the local machine, 127.0.0.1:8080 looks like yy.yy.yy.yy:80.
The first argument 8080 in LocalForward 8080 yy.yy.yy.yy:80 has the address omitted, and in this case it means the same as 127.0.0.1:8080.
When doing multiple port forwardings, you can bind by changing the local port number, or bind by changing the local loopback address.
That is,
    LocalForward 8080 yy.yy.yy.yy:80
    LocalForward 8081 zz.zz.zz.zz:80
would be binding with changed port numbers, and
    LocalForward 127.0.0.1:8080 yy.yy.yy.yy:80
    LocalForward 127.0.0.2:8080 zz.zz.zz.zz:80
would be binding with changed local loopback addresses.
Also,
LocalForward 0.0.0.0:8080 zz.zz.zz.zz:80
would make it accessible from outside.
If the local machine’s address within the LAN is, for example, 192.168.0.100,
hitting 192.168.0.100:8080 from another machine within the LAN would ultimately forward to yy.yy.yy.yy:80.
0.0.0.0:8080 is IPv4-only, ::8080 is IPv6-only, and *:8080 supports both.
RemoteForward
Host my-con-name
    HostName xx.xx.xx.xx
    Port 22
    User my-user-name
    IdentityFile ~/.ssh/id_rsa
    IdentitiesOnly yes
    RemoteForward 80 yy.yy.yy.yy:8080
RemoteForward can be thought of as the “reverse” of LocalForward.
That is, when access occurs to port (127.0.0.1:)80 on the remote machine, access to yy.yy.yy.yy:8080 from the local machine occurs.
Data returned from yy.yy.yy.yy:8080 appears to come from port 80 of the remote machine.
This is a bit hard to visualize, but consider the setting:
RemoteForward 0.0.0.0:80 127.0.0.1:8080
This gives you an idea of when you might use it.
When you want office colleagues to see a development server running at home, you can use a setting like the above to SSH to an office machine or EC2 on AWS to make it viewable.
Basic authentication should be added, and nowadays ngrok is also a convenient option.
Also,
RemoteForward :2222 127.0.0.1:22
With a setting like this, for example, if you connect from your home machine to a cloud machine, you can SSH to your home machine via the cloud machine.
DynamicForward
DynamicForward is quite different from the LocalForward/RemoteForward mentioned above. It sets up something called a SOCKS proxy, and through it, makes the local machine behave as if it were inside the remote network.
In simple terms, it’s like a VPN.
However, SOCKS proxy differs in that it is a proxy that requires consideration at the application layer (meaning it doesn’t transparently handle all traffic like a VPN, so some applications may not support it or may require configuration), and it also doesn’t encrypt by itself.
It is used like this:
Host my-con-name
    HostName xx.xx.xx.xx
    Port 22
    User my-user-name
    IdentityFile ~/.ssh/id_rsa
    IdentitiesOnly yes
    DynamicForward 1080
This sets up a SOCKS proxy on port 1080 (1080 is conventionally often used).
The method to use this established SOCKS proxy differs by application, of course, but it can also be set system-wide (whether applications use this setting depends on the application).
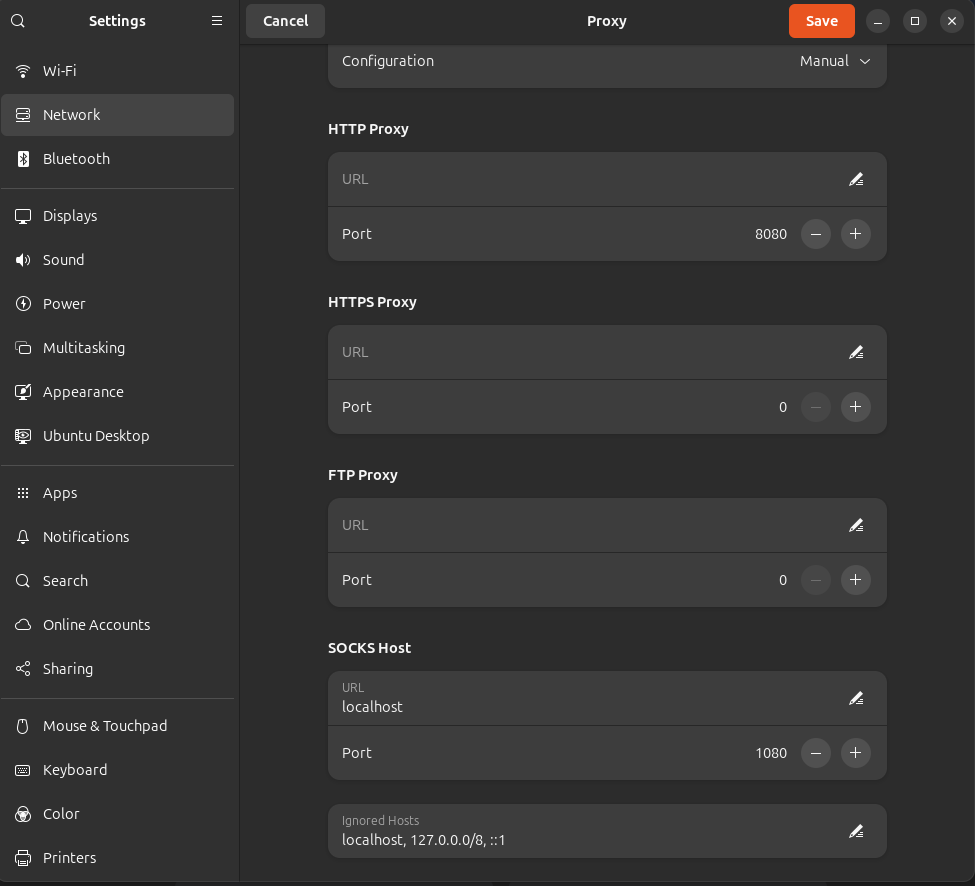
In Ubuntu, it can be configured from Settings→Network→Network Proxy.
In Windows, you can set the address and port from “Start” → “Settings” → “Network & Internet” → “Proxy”, but the correct way seems to be setting the address as “socks=localhost”. Since not many people use it, it’s a crude specification.
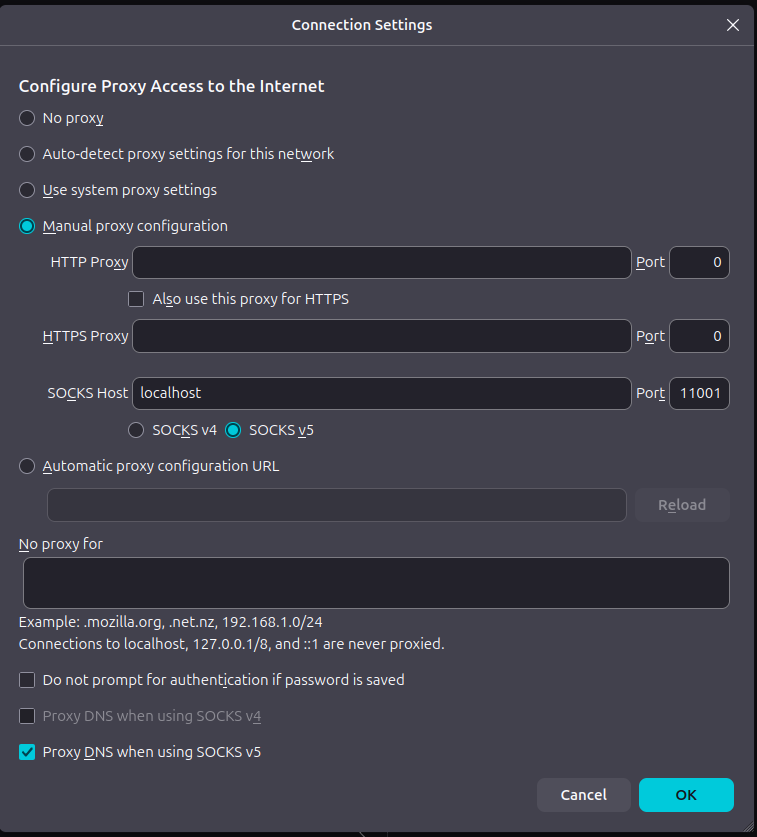
Application-level settings can be done in Firefox, for example, from General→Network Settings→Manual proxy configuration. Selecting Use system proxy settings will use the system settings.
For curl, specify it like this:
curl -x socks5://localhost:1080 http://www.example.com/
f Option and N Option
When you only want to do port forwarding and don’t need to run remote commands, you can use the f option and N option in combination.
ssh -fN my-con-name
The f option is for forking and running in the background.
However, it cannot execute without a specified command.
Since there’s no particular command you want to execute, use the N option. The N option is for not executing remote commands.
X11 Forwarding
Host my-con-name
    HostName xx.xx.xx.xx
    Port 22
    User my-user-name
    IdentityFile ~/.ssh/id_rsa
    IdentitiesOnly yes
    ForwardX11 yes
This forwards GUI applications from the destination so you can view them locally.
Port Knocking
SSH servers sometimes have a security layer called port knocking.
This means the SSH port is normally not exposed, and the port is opened for a certain period only by knocking on ports in a specific sequence.
To automatically perform this from the SSH client side, you can configure it like this:
Host my-con-name
    HostName xx.xx.xx.xx
    Port 22
    User my-user-name
    IdentityFile ~/.ssh/id_rsa
    IdentitiesOnly yes
    ProxyCommand bash -c 'knock -d 100 %h 7000:tcp 8000:tcp 9000:tcp; sleep 1; exec nc -w 10 %h %p'
Here I used the knock command.
The external command described in ProxyCommand is launched when you ssh my-con-name, and its stdin/stdout is directly connected to SSH packet input/output.
Conclusion
I found that SSH and SSH Config can be elaborately configured to do many things. There seem to be many more features, but I’ll leave it at this for now.